Trainual connects with Okta so your team can sign in once, stay secure, and get straight to work without juggling yet another username and password.
👉 Before you start:
- SSO integrations are only available under select Trainual subscriptions. If needed, reach out to our support team directly to see if your plan qualifies. 📧
- You will need an Admin+ permission level in Trainual and an administrative access level in your Okta platform to set up this integration.
- You must add users to your Trainual account for them to actively use SSO.
🗂️ Table of contents: Skip around to just the parts you need with these links.
Overview
SSO logins make accessing Trainual simple and secure. With SSO integrations...
- 🛡️ Your company's knowledge has an extra layer of protection.
- 🔑 Sign-ins are quick and hassle-free for everyone.
- 🧑💻 You can expect fewer password reset headaches (IT will thank you.)
- 🙌 Password fatigue is lessened.
Integration setups may seem intimidating, but everything here is broken down step by step so you can feel confident no matter your technical skill level.
Okta web setup:
Use this five-step Okta guide to begin setting up this SSO for your Trainual account.
🔹 Step 1 → Connect Trainual as a new application from your Okta dashboard.
- Log in to your Okta "Admin Console."
- Expand the "Applications" option from the left-hand navigation menu.
- Open "Applications."
-
Hit the “Create App Integration” button.

-
Take the following actions in the "Create a new app integration" window:
-
Select “OIDC - OpenID Connect” as the sign-on method.
-
Choose “Native Application” as the application type.

-
-
Click the“Next” button to proceed.
🔹 Step 2 → Configure your app intergration's general settings.
-
Input “Trainual” (or something identifiable) as your "App integration name."
- Select the following grant types:
- "Authorization Code."
- "Refresh Token." ✅
🔹 Step 3 → Add configurations to your app's sign-in and sign-out redirect URIs.
- Hit the "Add URI" button under the "Sign-in redirect URIs" line.
- Enter the following redirect sign-in scheme:
https://app.trainual.com/users/auth/oktaoauth/callback

- Hit the "Add URI" button under the "Sign-out redirect URIs" line.
- Enter the following redirect sign-out scheme:
https://app.trainual.com/

📝 Please note:
- It's very important that the auto-populated "Sign-in redirect URIs" and "Sign-out redirect URIs" lines are not removed or edited. To recap, these are the ones labeled "Keep existing line" in the screenshots above.
-
If your Trainual account uses a custom domain, be sure to add that additional redirect under the "Sign-in redirect URIs" section.
-
Example:
https://app.YOURTRAINUALCUSTOMDOMAIN.com/users/auth/oktaoauth/callback
-
🔹 Step 4 → Decide who gets access under assignments.
- Choose who can access the app under "Controlled access":
- "Allow everyone in your organization to access."
- If this option is selected, also check the "Enable immediate access: Enable immediate access with Federation Broker Mode" setting.
- "Limit access to selected groups."

- "Allow everyone in your organization to access."
🔹 Step 5 → Save and finalize the Okta steps for your newly added app.
- Click the "Save" button.
- Stay on your app’s "Client Credentials" redirect page and open Trainual in a new browser tab (this information is needed for the Trainual set up steps.)
👷 Trouble? If setup fails, restart all steps and verify your client secret is correct.
Trainual Okta web setup:
Next, you'll need to connect the Okta integration inside Trainual.
- Expand the "Marketplaces" options from the left-hand navigation menu.
- Select "Integrations."
- Search for and open “Okta.”
- Click the "Connect for web” button.
- Copy over the client ID, client secret, and Okta domain from your open Okta tab and paste them into the matching fields in Trainual.

- *Optional: Customize your "Sign in" button text.
- Hit the “Connect” button to integrate.
📝 Please note: You’ll know that Okta has been successfully connected when you see this green confirmation on the Okta Trainual integration page.![]()
Trainual Okta mobile setup:
Want to enable Okta SSO on mobile too? Here’s how to connect that in Trainual.
- Expand the "Marketplaces" options from the left-hand navigation menu.
- Select "Integrations."
- Search for and open “Okta.”
- Click the "Connect for mobile” button.
- Copy over the client ID and issuer URI from your open Okta tab and paste them into the matching fields in Trainual.

- Hit the “Connect” button to integrate.
📝 Please note: To find your Okta issuer URI for the instructions above, simply...
- Log in to your Okta "Admin Console."
-
Expand the "Security" option from the left-hand navigation menu.
-
Open "API."
- Copy your "Issuer URI" from the "Authorization Servers" tab.

Test your Okta web SSO:
Use these steps to log into Trainual with Okta web for the first time.
-
Sign out of your Trainual web app and stay on the login page.
-
Look for and click on the “Sign in with Okta” button.
-
Authenticate your Okta credentials for your first use to sign back in.
📝 Please note: If you don’t see the Okta icon, clear your browser history and refresh the page. Once completed, you’ll be signed in with Okta on future visits.
Test your Okta mobile SSO:
Use these steps to log into Trainual with Okta mobile for the first time.
- Sign out of your Trainual mobile app and stay on the login page.
- Use your email on the first sign-in page.
- Look for and click on the “Sign in with Okta” button.
- Authenticate your Okta credentials for your first use to sign back in.
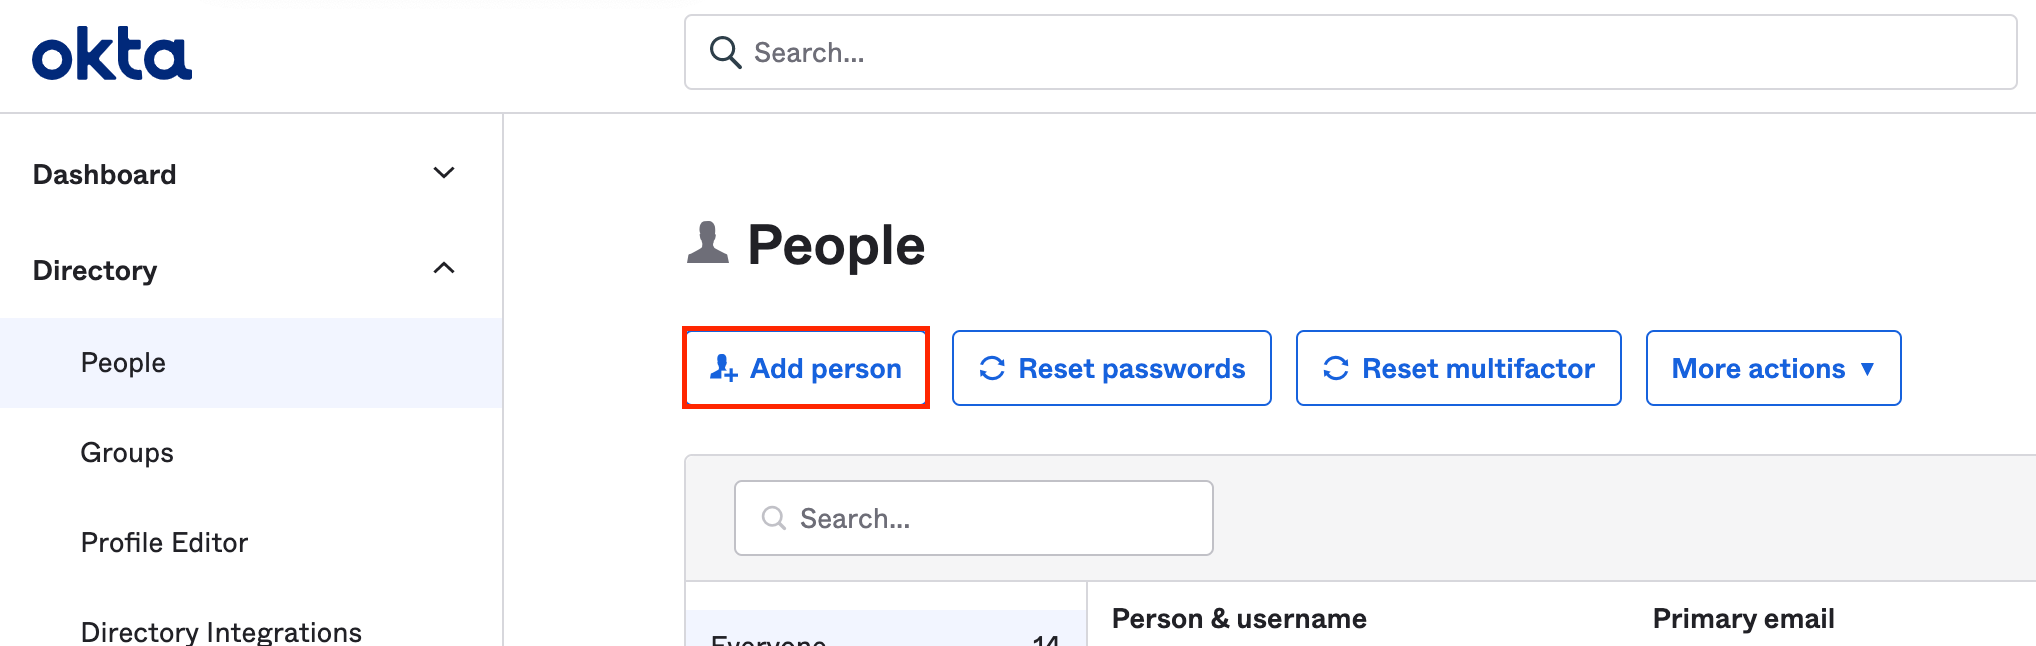
Add more users to Okta:
Don’t forget to add new teammates to Okta so they can sign in with SSO too.
- Log in to your Okta "Admin Console."
-
Expand the "People" option from the left-hand navigation menu.
-
Open the "Add person" tab.
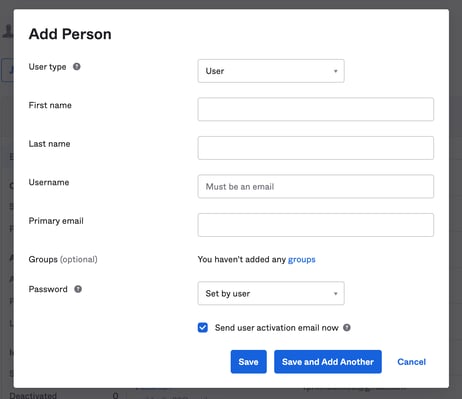
- Complete the following fields in the pop-up window:
-
Select "User" for the user type.
-
Enter your user's...
-
First name.
-
Last name.
-
Username (this is the user's email address.)
-
-
Choose any groups (skip this if you haven’t added groups in Okta).
-
Select "Set by user" for the password.
-
Check the "Send user activation email now" box.
-
-
Click "Save" or "Save and Add Another" to apply your changes.
📝 Please note: Users will receive a welcome email from Okta that looks like this...

📧 The welcome email from Okta includes:
-
A link to activate Okta.
-
The user's email address (which will also be their username).
-
Your organization's direct Trainual sign-in page.
🔐 Okta activation links expire in 7 days, so make sure passwords are set ASAP.
Enforce SSO login:
Optionally, you can require SSO only sign-ins for your Trainual account.
- Expand the "Account" options from the left-hand navigation menu.
- Select "Settings."
-
Locate and toggle on the "Require all users to login with single sign on (SSO)" setting from the "General" tab.
-
Hit the "Save" button to apply the account change.
FAQs:
How can I submit my feedback and ideas about features?If you'd like to share your thoughts about Okta SSO or think of something else you'd like to see added in the future, send us your feature requests and ideas.
Learn more about integrations:
- Connect your current HRIS or payroll system for quick teammate info syncing.
- Easily connect your Trainual account to thousands of other apps with Zapier.
- Capture knowledge and build training content from Slack.