Learn how to place photos side by side in your steps.
Are you looking for a way to tidy up your content? Learn how to get a more polished look by arranging multiple images side-by-side in your steps!
To add images side-by-side (horizontally), follow the process below:
-
Insert a table with the number of columns and rows equal to the amount of images you want to add side-by-side.
-
Insert images into the cells of your table by using the "Add image" tool.
-
Resize the images so they can fit horizontally next to each other.
📹 See the video below for a guided walkthrough on how to align your images side-by-side!
📝 Please note: If a user is viewing the content on a contracted or smaller screen, such as on a smartphone, images may display in a stacked, vertical format.
To adjust table rows and columns:
Click on the three dots to the far left-hand side of your table (see image below).
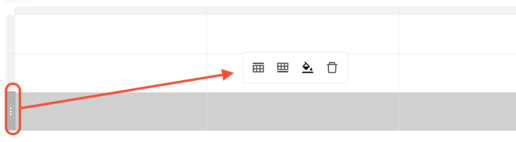
This will pull up a small, centered menu on your screen that will allow you to...
-
Add a new row above the highlighted row.
-
Add a new row below the highlighted row.
-
Change the color of the background of the cells in that row.
-
Remove (aka — delete) the highlighted row.
These same actions can be done with table columns if the three dots at the top of the column are clicked.